Creating liveries
Everything for a single livery lives on the Edit liveries page, organized into four tabs: Textures, Thumbnails, Details, and Model.
- Textures: defines the texture images used in your livery, including texture “flags” used by the SDK when compiling images into game assets.
- Thumbnails: defines the thumbnail images used in the MSFS livery selection user interface.
- Details: defines the parameters which populate the
aircraft.cfg(monolithic aircraft) orlivery.cfg(modular aircraft); this includes items such as the livery name, ATC ID, etc. - Model: a placeholder tab for future functionality in the MSFS Livery Toolkit.
- The texture selector
- Texture types and compile flags
- Painting your livery
- Registration details and thumbnails
The texture selector
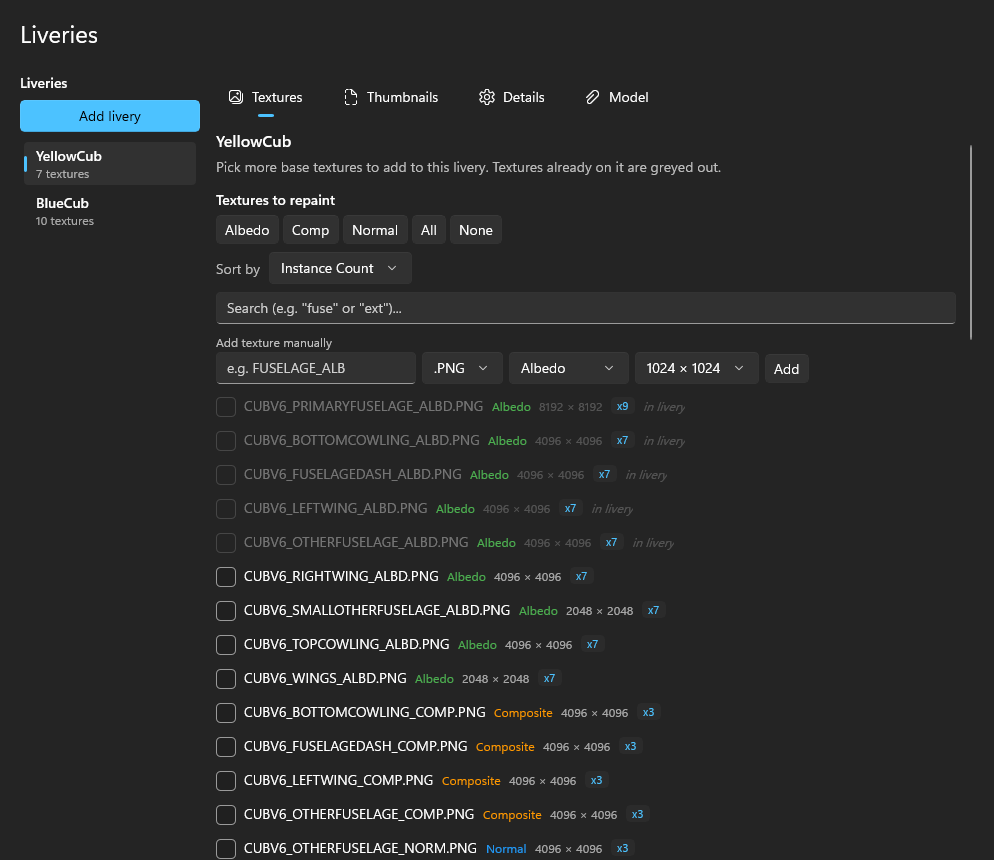 When you add a livery or add textures to an existing one, the texture selector helps you pick which textures to include in your livery (i.e. which images you want to repaint). Complex add-on aircraft can contain hundreds of texture files, so the selector does the untangling for you:
- Unified fallback scan: flattens every texture the aircraft can reach through its
texture.cfgfallback chains into one list, even across shared folders or entirely separate sibling aircraft directories. When the same filename exists in several folders, the highest-resolution copy is offered. - Instance-count badges: a badge (e.g. ×3) shows how many base aircraft folders a file appears in. A higher instance count suggests a texture file that is probably used for liveries, since multiple copies of it exist withing the base aircraft package. Single-instance textures are more likely to be a common / shared asset and less likely to be needed in a livery.
- Filters and quick-select: sort by name, type, resolution, or instance count; live text filtering; and one-click category toggles (e.g. “Albedo only”).
- Smart pre-selection: the app remembers your texture choices and custom fallback paths per base aircraft, globally, so returning to an aircraft you’ve painted before pre-selects your usual layout, and later liveries in a project mirror the most recently edited one. The very first livery for an aircraft you’ve never painted starts with nothing pre-selected, so you choose deliberately.
- Manual add: if you have a need for a texture file that is not found in the base aircraft scan, you can manually enter the filename, resolution, and texture type to force-add it.
Fallback selector
A reorderable checklist controls the exact folder order the sim searches for missing textures (fallback.1, fallback.2, …), written into the livery’s texture.cfg. The app suggests a baseline you can freely adjust with per-row Move up / Move down buttons. If the automatic scan can’t find a path (for example a cross-SimObject reference several folders away), add it as a manual fallback entry - it even accepts a pasted full fallback.N=... line and trims it to just the path.
Fallback checker
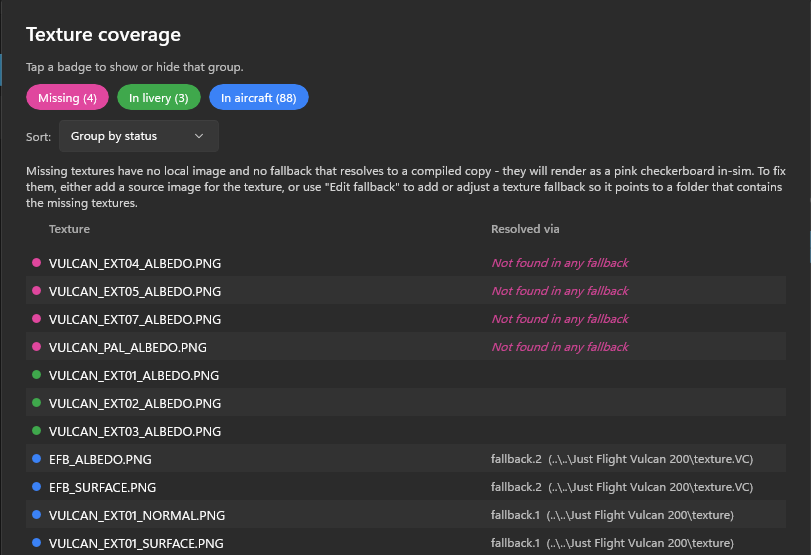 The Check fallback button is available on the Liveries page and from the Edit fallback panel. It will analyse the livery’s images and texture fallbacks to ensure MSFS will find every texture the aircraft requires. Textures will be listed in one of three states:
- Missing (pink): the simulator will not be able to find this texture because no texture fallback path contains that file - the texture will appear as pink checkerboard in the sim. This indicates you have not set your texture fallbacks correctly.
- In livery (green): the texture is included with your livery.
- In aircrafft (blue): the texture can be found by the texture fallbacks. Use the Resolved via column to see which fallback path found it.
Texture types and compile flags
The toolkit classifies each texture using the official SDK metadata from the base aircraft - never by filename. So a file named ..._ALBEDO.PNG that actually carries alpha transparency is correctly treated as a Decal/Transparent map.
| Type | What it is |
|---|---|
| Albedo | The core colour and paint map. |
| Composite | A packed image of Ambient Occlusion (red channel), Roughness (green channel), and Metallic (blue channel). |
| Normal | Surface detail. |
| Emissive | Self-illuminated areas such as instruments. |
| Decal / Transparent | An overlay layer that relies on an alpha channel. Often use for higher resolution areas of local detail such as placards, logos or text. |
Compile flags: tell the SDK texture compiler how to process each image (high-quality compression, alpha preservation, mipmaps, and so on). By default the toolkit matches the exact flags the original aircraft developers used. Change anything in the flag editor and a highlight appears alongside a one-click Reset to base button.
Painting your livery
Once your selection is confirmed, the workspace is populated with correctly-sized blank PNG canvases as placeholders. There are two ways to get a starting image for each texture:
- Generate placeholders: blank, correctly-sized canvases labelled with the filename and resolution. If you plan to use images generated from a paintkit this is the recommended approach.
- Extract from base: decode the base aircraft’s own already-compiled texture back into an editable PNG, a real head start when no paintkit exists. This handles both 2020 DDS and 2024 KTX2, including MSFS’s Oodle-compressed KTX2 variant that defeats most other tools. When a texture exists as more than one compiled copy in the base, you choose which instance to extract.
Your artwork is protected. The tool never automatically overwrites an existing image file in your workspace - neither a placeholder nor an extracted image will wipe out artwork you’ve already put there. Once you replace a placeholder with your own painting, it is safe.
On each texture row an Edit source artwork action (pencil icon) will be available if the application can find a Photoshop, Affinity, Gimp or Paint.NET artwork file (.psd, .afphoto, .xcf, .pdn) where the filename matches the PNG (excluding the file extension). By default the application will check for paintkit artwork files in the same folder as the PNG images, however you can specify another folder at the top of the Textures panel.
Use the UV+ button to extract a UV map wireframe from the aircraft model. This image file will be created in the same folder as the other texture images, and will have a matching filename with the suffix _UV appended. Any textures that have a UV map already extracted will display a small “UV” indicator in the texture list.
Each texture row also has a Clear image action (eraser icon) that removes just the source PNG while keeping the texture entry, so you can swap a placeholder for an extracted image or vice versa. It is also possible to fully remove a texture from the livery using the Remove texture action (trashcan icon) - this will remove the texture slot from your livery and remove the PNG from disk. You will receive a confirmation prompt when using Clear image or Remove texture.
Registration details and thumbnails
- Details tab: edit every sim-supported
[fltsim.N]field (tail number, ATC callsign, title, and more). Fields that differ from the base default show a clear indicator and can be reverted instantly. - Thumbnails tab: a built-in viewer that tracks the exact files and dimensions your sim generation requires. Auto-generate baseline icons, or use Replace… to drop in a real image (a size mismatch warns but still lets you proceed). Manually-added thumbnails are never overwritten.